
ASUS RT-AX58U setup
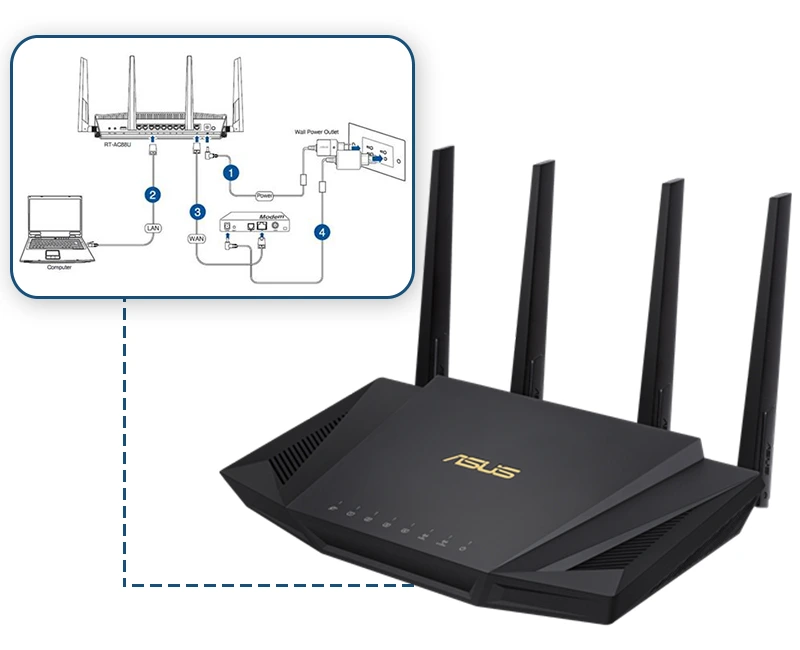
- Use an Ethernet cable to link the modem and the RT-AX58U router.
- Turn on the router and watch for a stabilisation of the LED lights.
- Use a browser to visit the router’s web interface at “http://192.168.1.1”.
- Use the default login information or create a new username and password.
- To establish fundamental settings, such as the kind of internet connection (DHCP/PPPoE), follow the setup process
- Establish a network name (SSID) and secure Wi-Fi password.
- If necessary, adjust advanced settings like port forwarding, firewall, and QoS.
- For best security and performance, update the firmware.
- Using the given credentials, connect devices to the Wi-Fi network.
- Take advantage of dependable, fast internet with your ASUS RT-AX58U setup router.
ASUS RT-AX58U setup manual
- To view the router’s web interface, open a browser and type “http://192.168.1.1”.
- Use your personalised or default credentials to log in.
- To configure the internet connection type (DHCP/Static/PPPoE), navigate to the WAN settings.
- Modify firewall, port forwarding, and QoS advanced settings as needed.
- For best security and performance, update the firmware on the router.
- Set up extra features such as guest network settings, parental controls, and VPN.
- Utilising the unique login information, connect devices to the Wi-Fi network.
- Enjoy your custom configured ASUS RT-AX58U router after saving the settings.
ASUS RT-AX58U WPS setup
Use these procedures to configure the ASUS RT-AX58U router via WPS (Wi-Fi Protected Setup):
- Once the LED lights on your RT-AX58U router have stabilised, turn it on.
- Find the router’s WPS button.
- The “WPS” label is typically present on the device’s side or back.
- Click the WPS icon on your network.
- Start the WPS procedure on your Wi-Fi-capable devices within two minutes.
- Usually, to do this, you have to hit the device’s WPS button or choose WPS in the Wi-Fi settings.
- Once connected, the device and router will exchange data, and the router’s WPS LED should become solid to signify a successful connection.
Note: You can typically start WPS using the device’s network settings if it lacks a WPS button. See the handbook for your device for detailed instructions.
Asus rt-ax58u setup app
Using the ASUS Router app, configure the ASUS RT-AX58U setup as follows:
- Link the mobile device to the WiFi of the router.
- Launch the app, select “Router,” and enter your login information.
- For the first asus rt-ax58u setup, adhere to the on-screen directions.
- Set up your Wi-Fi password, internet connection type, and settings.
- Configure extra features such as parental controls and guest network.
- For firmware updates, device control, and real-time monitoring, use the app.
- To manage devices outside of your home network, enable remote access.
- Adjust the settings according to your tastes.
ASUS RT-AX58U setup troubleshooting tips
If problems arise when configuring the ASUS RT-AX58U, take into consideration the following troubleshooting procedures:
- Verify that Ethernet cables are plugged in firmly.
- Check if you are able to access the router’s web interface by going to “http://192.168.1.1”. Make sure your login information is accurate.
- For bug fixes and enhanced functionality, update the router’s firmware to the most recent version.
- Use the router’s setup wizard to check and adjust the DHCP and PPPoE internet settings.
- Verify that the Wi-Fi password, security settings, and SSID are all configured correctly.
- Turn off the modem, router, and any attached devices.
- Issues with connectivity can be fixed by restarting.
- Press the reset button on the router to carry out a factory reset if issues continue.
- Configure the settings anew.
- Make sure the router is positioned in the middle and away from obstructions like as tall walls or electrical equipment.
- To make sure there are no service interruptions, get in touch with your ISP if problems with your internet connection continue.
- If you need help, get in touch with ASUS support or refer to their online documentation and forums.
ASUS RT-AX58U firmware update
For the ASUS RT-AX58U firmware update:
- Use a browser to visit the router’s web interface at “http://192.168.1.1”.
- Enter your credentials to log in.
- Go to the “System” or “Administration” tab.
- Choose “Firmware Upgrade” or a related option.
- “Check” to see any updates.
- Using the interface, upload the firmware file.
- Hold off until the upgrade is finished; the router could reboot.
- Keep the process going without stopping it.
- Reboot the system and log back in to verify the new firmware version.
- Make that the router’s settings are preserved and that the most recent firmware has given it improved capabilities and security.
ASUS RT-AX58U reset process
Resetting the router ASUS RT-AX58U:
- Find the reset button; it’s normally located on the rear.
- Turn on the router and use a paperclip to hold down the reset button for five to ten seconds, or until the LED indicators begin to flash.
- When the router reboots, let go of the button.
- Reconfigure the router since it has now been reset to factory defaults.
- Access the web interface at “http://192.168.1.1” with the preconfigured credentials or the default ones.
- To adjust the Wi-Fi and internet, use the setup wizard.
- If required, update the firmware.
- Reconnect devices using the modified Wi-Fi settings.
- Only reset if absolutely necessary, as it removes all personalised configurations and settings.